-
Notifications
You must be signed in to change notification settings - Fork 2
Home
The Cuda-based SPIM Reconstruction plugin uses CUDA for GPU-based multi-view deconvolution of SPIM data. The key idea is to process planes orthogonal to the rotation axis independently, which reduces memory requirements, so that the entire deconvolution fits into GPU memory. This requires, that
- Multi-view data is registered.
- PSFs are available, also as planes orthogonal to the rotation axis.
This suite of plugins assumes that registration has been performed using Stephan Preibisch's Bead-based Registration Fiji plugin http://fiji.sc/SPIM\_Bead\_Registration. We then provide the tools to align the data, extract the PSF planes and deconvolve it. A typical workflow therefore looks like this:
- Acquire multi-view data.
- Register it using the Bead-based registration plugin.
- Use the Transform Cuda plugin to apply the transformation matrices (see below).
- Use the Extract PSF Planes plugin to extract PSF planes (see below).
- Use the Plane-wise deconvolve Cuda plugin to do the deconvolution (see below).
There are 3 plugins for the actual deconvolution:
- Plane-wise deconvolve Cuda is the plugin which should normally be used to process the results of the 'Transform Cuda' plugin.
- Plane-wise deconvolve Cuda (Advanced) allows to specify all required files (e.g. input files, kernel files, etc) explicitly instead of inferring it from the output folder of 'Transform Cuda'.
- Plane-wise deconvolve Cuda (Interactive) allows to perform deconvolution interactively to estimate the number of iterations needed, by processing single planes and displaying the result immediately.
- A 64-bit operating system (and Fiji version).
- A CUDA capable (i.e. Nvidia) graphics card.
- The newest drivers for your graphics card.
assuming the Fiji installation directory FIJI_INSTALL_DIR:
- Create a folder FIJI_INSTALL_DIR\lib\win64
- Unzip the contents of the zip file to a convenient location
- Copy the DLLs to FIJI_INSTALL_DIR\lib\win64
- Copy the jar files to FIJI_INSTALL_DIR\plugins
- Restart Fiji
- Create a folder FIJI_INSTALL_DIR/lib/macosx
- Unzip the contents of the zip file to a convenient location
- Copy libNativeSPIMReconstruction.jnilib and libcufft.6.5.dylib to FIJI_INSTALL_DIR/lib/macosx
- Copy the jar files to FIJI_INSTALL_DIR/plugins
- Restart Fiji.
- Create a folder FIJI_INSTALL_DIR/lib/linux64
- Unzip the contents of the zip file to a convenient location
- Copy libNativeSPIMReconstruction.so and libcufft.so.6.5 to FIJI_INSTALL_DIR/lib/linux64
- Copy the jar files to FIJI_INSTALL_DIR/plugins
- Restart Fiji.

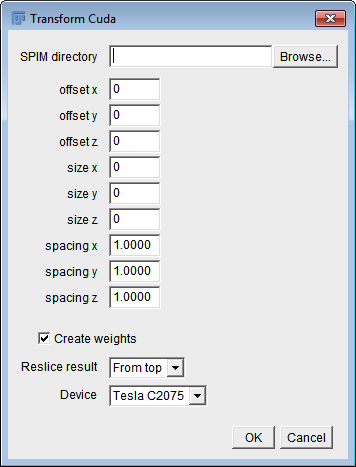
This plugin uses CUDA to apply the transformation matrices (obtained by the Bead-based registration plugin) to the original data. It creates an 'output' folder within the specified SPIM directory. In that folder, aligned data are saved in 8-bit or 16-bit raw format (depending on the bit depth of the input images, Intel byte order), together with a file 'dims.txt' specifying width, height and depth of the output stacks. Also, a folder 'masks' within the output folder is created containing the weights needed for the deconvolution. Weights are saved as a single plane per view in raw 32-bit floating point format.
| Parameters | Description |
|---|---|
| SPIM directory | The directory containing the SPIM data. |
| offset x/y/z | The offset of the cropping area (bounding box) in the x/y/z-dimension of the output image relative to the uncropped image. A value of 0 refers to the top-front-left corner of the bounding box surrounding all views. |
| size x/y/z | The size of the cropping area (bounding box) in the x/y/z-dimension of the output image relative to the uncropped image. A value of 0 means no cropping. |
| spacing x/y/z | Pixel width/height/depth in the output image. |
| Create weights | Create weights which will determine how much every view contributes to the deconvolution. |
| Reslice result | Plane-wise deconvolution requires data to be stored on disk as planes orthogonal to the rotation axis. So if the rotation axis is the y-axis, for example, you need to use 'From top' here. If it's the x-axis, you'll need 'From right', otherwise no reslicing is needed. |
| Device | The Cuda device to compute on. |

This plugin uses Stephan Preibisch's Multi-view deconvolution Fiji plugin to obtain the PSFs for each view and then extracts the middle plane. It creates an output folder called 'psfs' within the specified SPIM directory. In the PSF directory, it saves one PSF plane per view, in raw 32-bit format (Intel byte order), and a file called 'dims.txt' specifying the spatial extent (width and height) of the PSF planes.
| Parameters | Description |
|---|---|
| SPIM directory | The directory containing the SPIM data. |
| Pattern of SPIM files | This is the same as for the Bead-based registration (see http://fiji.sc/SPIM\_Bead\_Registration) |
| Angles to process | This is the same as for the Bead-based registration (see http://fiji.sc/SPIM\_Bead\_Registration) |
| Reslice result | This should be set to the rotation axis of the multi-view data. E.g. if the rotation axis is the y-axis, the plugin will extract the middle plane along the y-axis for plane-wise deconvolution. |

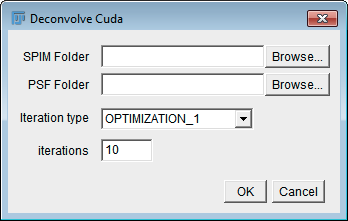
This plugin uses CUDA to deconvolve multi-view data plane-wise. It saves the result as 8-bit or 16-bit raw data (depending on the bit depth of the input images). In contrast to the advanced version (see below), it searches itself for all files to be processed by scanning the folder structure of the SPIM directory. It requires that Transform Cuda has been executed before.
| Parameters | Description |
|---|---|
| SPIM Folder | The directory containing the SPIM data. |
| PSF Folder | The directory containing the PSFs (i.e. the output folder of the Extract PSF Planes plugin). |
| Iteration type | The type of iteration. See http://fiji.sc/Multi-View\_Deconvolution for details. |
| iterations | The number of iterations to perform. |

This plugin uses CUDA to deconvolve multi-view data plane-wise. It saves the result as 8-bit or 16-bit raw data, depending on the bit depth of the input images. This is the 'advanced' version which allows to specify all required files explicitly.
| Parameters | Description |
|---|---|
| data view X | The acquired data for each view, resliced and saved as planes orthogonal to the rotation axis, as raw unsigned 8- or 16-bit data (Intel byte order). |
| weight view X | The weights for each view, which define how much each view contributes to the deconvolution. These can be generated automatically in the 'Transform Cuda' plugin, which saves them as a single plane per view in raw 32-bit floating point format. |
| kernel view X | The kernel (PSF) for each view, as 32-bit raw data. |
| output file | The path to the output file. The output will be saved in raw unsigned 8- or 16-bit format. |
| width | The width of the input data. |
| height | The height of the input data. |
| depth | The depth of the input data. |
| kernel width | The width of the kernel. |
| kernel height | The height of the kernel. |
| iteration type | The type of iteration. See http://fiji.sc/Multi-View\_Deconvolution for details. |
| iterations | The number of iterations to perform. |

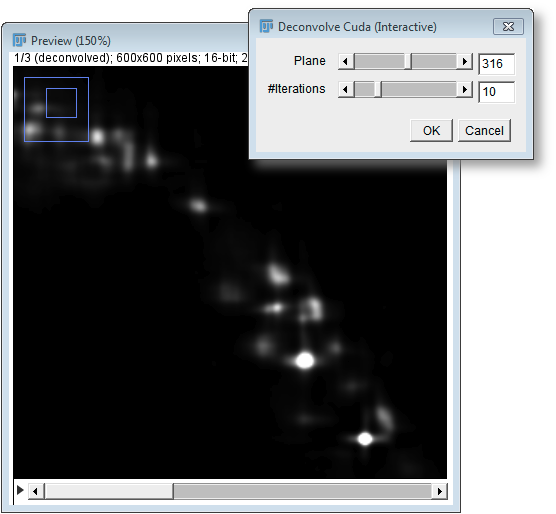
This plugin allows to perform deconvolution interactively to estimate the number of iterations needed, by processing single planes and displaying the result immediately.
| Parameters | Description |
|---|---|
| SPIM Folder | The directory containing the SPIM data. |
| PSF Folder | The directory containing the PSFs (i.e. the output folder of the Extract PSF Planes plugin). |
| Iteration type | The type of iteration. See http://fiji.sc/Multi-View\_Deconvolution for details. |

It then shows a preview image with a dialog that contains sliders for the current plane (which is processed and displayed) and the number of iterations. As the user moves these sliders, the deconvolution result gets immediately calculated and the preview image is updated. In fact, the preview window displays a stack, whose first slice is the deconvolution result and whose other slides are the raw data from all used views.